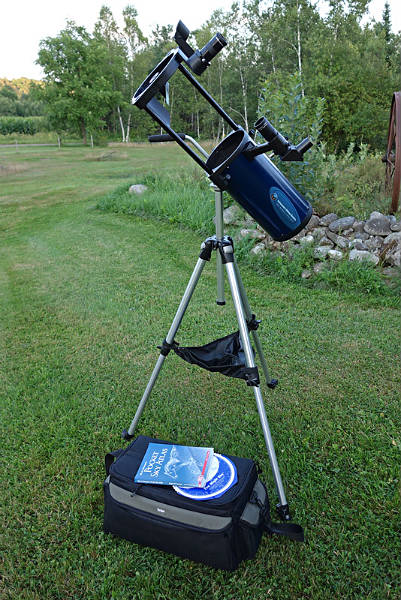
My OneSky travelscope in action. This photo was taken before adding the shroud described below.
The surest way to improve any telescope’s performance is to get it out under a darker sky. Living in suburban Massachusetts I’d have to drive significant distances to get to skies much darker than the one available from my red zone backyard. The darkest skies I regularly encounter are on family trips to rural areas.
Of course trying to fit a telescope into a car already packed with the whole family and all the associated cargo can be a challenge. Thus begins the search for a more portable telescope or travelscope. To my thinking a travelscope can be any telescope setup that prioritizes volume and/or weight over other concerns such as aperture or mount stability. Every one has their own circumstances and priorities and so travelscopes can look quite different from observer to observer.
As I mentioned in the general review of the AWB OneSky Telescope, my intent when buying the OneSky was to use it primarily as a travelscope. The OneSky appealed to me for its packed aperture to volume ratio and ease of setup.
The OneSky’s collapsible tube packs 5″ of aperture into a 16″ long package and the helical focuser has a very low profile. A Celestron C5 provides similar aperture in even less volume and weight but the OneSky has the advantage of going over 1º wider with a 32mm Plossl.
There are custom built travel Dobsonians that provide 8″ of aperture in a package not much bigger than the OneSky. These are impressive designs but they prioritize aperture over ease of setup, which is not what I am looking for right now. Compared to a solid tube reflector the OneSky requires maybe an extra 10 seconds to extend the OTA. Perfect.
The scope seems to maintain collimation relatively well over several sessions. When a collimation touch up is required the scope’s length makes it extremely easy as I can look through the collimation eyepiece and simultaneously reach the adjustment screws for the primary mirror cell located on the back of the OTA.
A simple travel eyepiece set of consisting of a 32mm Plossl, 8-24mm zoom, and 2.25x Barlow covers the scope’s capabilities pretty well with a max TFOV of 2.5º at 20x and high power of 180x. “Pleiades to planets” as they say. They do say that don’t they?
The Mount
The OneSky’s provided base is too bulky for me to travel with so a mount that packs smaller is needed. The telescope’s standard Vixen-style dovetail allows it to be used on a variety of astronomical mounts without modification. I use it on a Bogen 3011 tripod with a UA DwarfStar head. The mount weighs 6lbs and collapses to 28.5″ long.
I find the DwarfStar to work well with the scope and when it is balanced the movement is very smooth. I think a sturdier tripod would be more beneficial then a beefier head for this setup but for travel use my preferences tend toward keeping it small and light. Viewing at 180x isn’t bad in terms of vibration and adding suppression pads when not on grass makes a big difference.
Additional Enhancements and Modifications
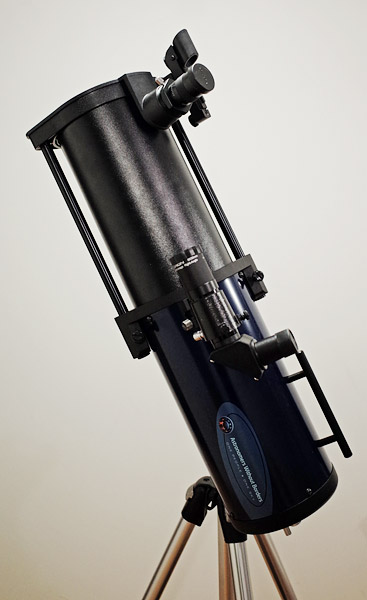
OneSky with shroud, RACI finder, and carry handle.
Since buying the OneSky I’ve made several modifications to customize the scope and enhance its performance for the way I use it. The biggest improvement has been the addition of a shroud constructed of 1/32″ Kydex plastic to protect the previously exposed secondary mirror from the contrast robbing effects of stray light and dew.
Before adding the shroud I had more than one observing session cut short by dew and sometimes would find myself trying to position my body between the secondary and a nearby light source. The OneSky’s design makes it simple to add a light / dew shield that slides into the OTA as the scope collapses giving the protection of a solid tube reflector telescope with the portability of a collapsible truss design.
I also added a Synta-style finder base to allow the use of a RACI finder along with the included red dot finder. The addition of the RACI finder makes star hopping to faint objects much easier than relying on the 2.5º max field of view available through the telescope eyepiece. A 6×30 finder is pictured but the central position of the finder base means that there is little change in the balance of the scope so a 50mm finder works just as well.
The addition of a cabinet pull for use as a carry handle makes one-handed handling of the scope a breeze. The most obvious areas of improvement are during setup and take down but the handle can also be used to aim the scope from the back when sighting through the RDF or even viewing through the eyepiece.
Taking the OneSky on the Road
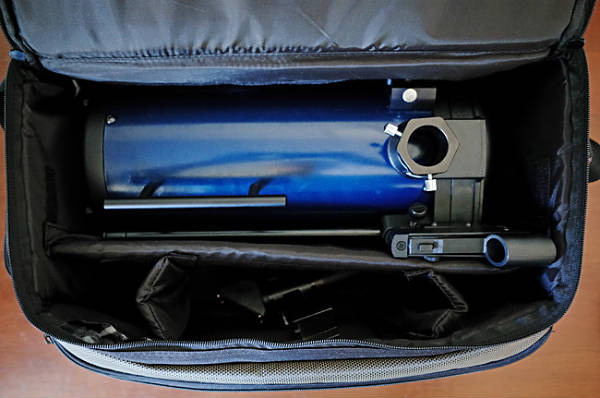
OneSky Telescope and Vivitar RGC-12 bag.
Most travelscopes wouldn’t be complete without a bag to carry them around. The bag I use with the OneSky is a Vivitar RGC-12 camcorder soft sided carry case. It fits the collapsed scope without having to remove the RDF and has room in the main compartment for the RACI finder, eyepieces, collimation tool, etc. My planisphere and Pocket Sky Atlas fit in there too. The bag’s outside pockets carry my flashlight, DwarfStar guide handle, and other handy things.
-Dave
Original content copyright 2015 by David Philips. All Rights Reserved. This post may contain links to affiliate sites; sales through affiliate links may benefit this site.
I love everything about this scope! Portable, affordable, powerful,and a great cause to boot! I was deciding between a Starmax 90mm for portability and a Starblast for power. This has everything and more, especially with your suggestions. Thank you!
Fantastic article and upgrades.
You mentioned a beefier tripod, what would you recommend? I was looking at a Manfrotto 3011 BN Basic tripod here – http://amzn.to/1U5FOcx
Does the Vivitar bag have clips or straps to attach the tripod to? Has it’s durability stood up to wear and tear since you wrote this?
Thank you!
The Bogen 3011 is what I currently use with the OneSky, it is light at only 5lbs and useable at 180x though vibrations take a few seconds to settle. If you don’t mind adding some weight I’d recommend the Vanguard Auctus Plus 323AT, currently on sale at B&H Photo for $159.99. The DwarfStar starts to be overwhelmed by this tripod and would recommend the MicroStar as a better match; size and weight increase over the DwarfStar is minimal.
The Vivitar bag does not have straps to attach the tripod, but it is possible to carry them both in the same hand by grabbing carry handle and then putting the tripod into the same hand before closing your grip. Mine hasn’t had a hard life but still looks and works great (zippers intact, etc).
Dave,
I like your modifications to the AWB to make it into a nice travel scope. Regarding the RACI addition — How did you fasten the Synta-style base to the OTA? I don’t see any rings so did you drill some holes and fasten it directly? Ditto for the handle?
Thanks,
Tom
Tom,
Yes, I used an electric hand drill to add holes in the steel tube to attach the finder base and the cabinet pull. I was able to keep the protrusions inside the tube low profile enough so as not to interfere with the plastic shroud sliding in to or out of the tube.
One question regarding the shroud: DId you remove the secondary mirror, slide the assembled shroud in and then re-install the secondary mirror or did you roll the shroud up, slip it in from the side and then fasten the shroud together (with tape or rivets after it was in? Probably not making myself clear here…sorry.
At first I thought I might need to move the secondary out of the way, either by sliding out the trusses completely or disassembling the upper collar, but then I found the second method you describe would work. After inserting and removing the shrould several times before fastening it (for test fitting and to mark the cut-out for the focuser), I used 3M double sided tape to secure the shroud to itself and then to the upper collar.
How is ithe 3-M tape holding up fastening the kydex roll? The tension may be a concern in the long run….I experienced some bad luck with the “red” wrapped 3-M product coming loose on other projects – especially when it gets cold outdoors. I like the shroud idea and hope for a permanent mounting, not dependent on tape if at all possible. Maybe pop rivets?
Handle addition is a GREAT idea for portability, as I will not have the base handle to use when travelling. RACI finder addition saves neck strain… will add to my OneSky ASAP! A well-designed little Newt with very good mirrors. Your retrofitted improvements make it a perfect grab-n-go scope! Glad I found this info. BTW, I found that teflon tape wrapping the male threads smooths and adds some tension to the helical focusing.
George,
So far the 3M tape is holding. That may be due to the outward pressure of the rolled shroud being held by the collar and other parts of the OTA so the tension is mostly into the tape rather than away. I’m glad to hear the additions shown here were helpful to you – they have made my scope more enjoyable. Good tip on taping the focuser threads.
Hey, David. I’m grabbing this scope really soon, it’s going to be my first scope, and for ease of use I was planning on putting it on a different mount, just like you. But I was thinking of putting it on an equatorial mount, so that I could then do some astrophotography, with it. Know any that you’d recommend with this?
Hmm, astrophotography demands a lot of a mount and is not an area where I have much experience. I’ve seen some setups that used the OneSky on a CG-4 with added drives modified to support guiding but a mount with built in drives and auto-guiding capability would be a better place to start. I’d suggest searching and reading the Astrophotography forum at Cloudy Nights for setups that are close to what you are looking for.
where did you get the kydex sheeting this is the same problem I have with my AWB scope too much side light bleed.
Also can you share some additional pictures of how you have it installed and other close ups of the modifications.