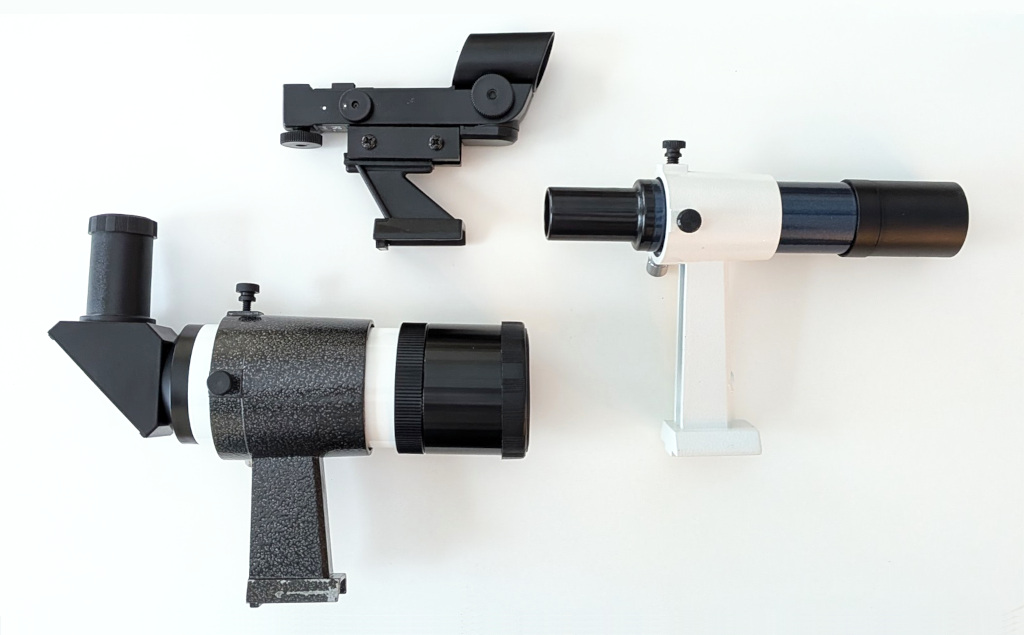
Telescope finders and finderscopes (clockwise, from top): Red dot finder, 6×30 straight-through, 8×50 RACI
In the excitement of selecting a first telescope many beginners overlook the importance of the finder. While finders and finderscopes may not be the most exciting pieces of observing kit they play an essential part in any telescope setup. The night sky holds countless visual treasures but in order to enjoy the enhanced views of these wonders offered by your telescope you’ll need to be able to point it accurately.
Without a good finder the task of getting a desired object within the view of the eyepiece can become a time-consuming and frustrating experience. Most telescopes show only a sliver of the sky at any given time, and even bright objects can prove surprisingly elusive. A finder serves as a bridge between the vast canopy of the night sky and the magnified but confined field of the telescope.
Broadly speaking, finders fall into two categories: unity (non-magnifying) finders and magnified finderscopes.
Getting on Target
Unity finders are unmagnified pointing devices that allow the user to “sight” the telescope. Their greatest strength is simplicity – with both eyes open and the entire sky available for orientation the telescope is pointed intuitively. Once mounted and aligned to the telescope they allow fast and accurate aiming to any spot in the sky.
Perhaps the most common unity finder is the basic red dot sight. These are found on many beginner telescopes, and for good reason – on an alt-az mounted telescope these are point and shoot finders. If you can see your desired target with the naked eye or estimate its position from visible reference points you can get it in the eyepiece quickly.
More advanced finders such as the Telrad or Rigel QuickFinder offer the benefit of projected reticle overlays that correspond to distance scales on star charts. These concentric circles extend the capability of the finder to enable precise star hopping. A comparison of several common finders is below:
| Finder | Degree Circles | Battery |
| Celestron StarPointer Pro | ~0.5°, ~1.5° | CR2032 |
| Explore Scientific Reflex Sight | 0.5°, 2°, and 4° | AAA (2x) |
| Rigel QuickFinder | 0.5°, 2° | CR2032 |
| Telrad Reflex Sight | 0.5°, 2°, and 4° | AA (2x) |
Magnified Finderscopes Reveal the Hidden Sky
Magnified finders are mini-telescopes that gather more light and magnify the view compared to our eyes. Common finderscope magnifications range from 6-10x with objective diameters from 30-50mm. Thus many more stars and objects are visible in the magnified finderscopes than can be seen by eye. This is especially helpful when viewing from a location where many stars are obscured by light pollution.
Straight-through finderscopes align the observer’s eye with the aiming axis of the telescope, like a unity finder but with the advantages of magnification. However, most straight-through finderscopes provide an inverted image requiring the observer to mentally invert the image and corresponding movements when aiming the telescope.
Straight through finderscopes with a correct image orientation are not nearly as common but are available. The corrected image makes pointing the telescope and star hopping to targets much more intuitive. These finderscopes combine the simple pointing capability of a unity finder with the enhanced visibility of a magnified view.

Long focal length telescopes such as Maksutovs or SCTs are especially well complimented by the wide-angle views provided by a RACI finderscopes.
Right Angle Correct Image, or RACI, finderscopes use a prism diagonal for a more comfortable viewing position. Their ergonomics and correct image orientation, which matches both the visible sky and star charts, make star hopping with these finderscopes a joy. However it can still be tricky to be sure the finderscope is pointed at the expected starting point. One method is to sight down the telescope tube for course aiming and then match the star field visible in the finder with a chart to verify the position is correct.
A RACI finderscope can also provide pleasing views of larger star clusters and other objects in its own right. The Pleiades and Hyades star clusters are great examples of subjects that look wonderful in an 8x or 9x finderscope, where the aperture and magnification bring out more stars and they are framed with much more space than in most telescopes (though binoculars are a treat too).
Using Multiple Finders for Efficiency and Comfort
Many observers use multiple finders simultaneously for a deluxe finder setup. A common pairing is to mount a unity finder for precise aiming alongside a RACI finderscope for magnified star hopping to targets. A telescope with separate finders dedicated to each of these specific purposes feels luxurious in function, efficiency, and ergonomics.

A Dobsonian telescope with both red dot and RACI finders.
Such a setup works best on larger telescopes where the extra weight, space, and complexity involved in using multiple finders doesn’t overwhelm the primary scope. It’s not uncommon to see Dobsonian telescopes with two or three different finders, but they aren’t the only types of telescope that can benefit from this kind of setup.
If your telescope doesn’t have or can’t easily mount a second finder base, a multifinder adapter can be used to mount multiple finders on a single base. Double and triple mount adapter bases are available.
Grab and Go Simplicity
On smaller scopes a single finder is usually a better match. I’ve used red dot, straight-through, and RACI finders at different times with my small, “grab and go” observing setups. Having different types of finders in your observing toolbox allows you to optimize the configuration for the intended subjects and make the most of limited time under the stars.
When viewing the Moon, planets, and other brighter objects a red dot finder is all that is needed. A correct image straight through finder is more versatile and gives both aiming and star hopping capabilities in a single finder, though comfort is somewhat compromised. If I expect to be spending a significant amount of time star hopping to fainter targets, a RACI finder has advantages.
Tools for the Journey
Over time I have come to appreciate that there is no single “best” finder. Different tools serve different purposes, “horses for courses” as the saying goes. When practical, using a combination of finders can provide a comfortable and efficient observing experience that is hard to beat.
As always, spending time under the night sky is its own reward – so the best advice is to get out with your telescope. Start with what you have and tune it as you find what works best for your observing.
-Dave
Original content copyright 2026 by David Philips. All Rights Reserved. This post may contain links to affiliate sites; sales through affiliate links may benefit this site.